Underlay stitches explained
Underlay is a layer of stitches sewn first, under the visible ones, to steady the fabric and give the top stitches a base. Without it, edges look ragged and thread sinks in; too much makes the design stiff.
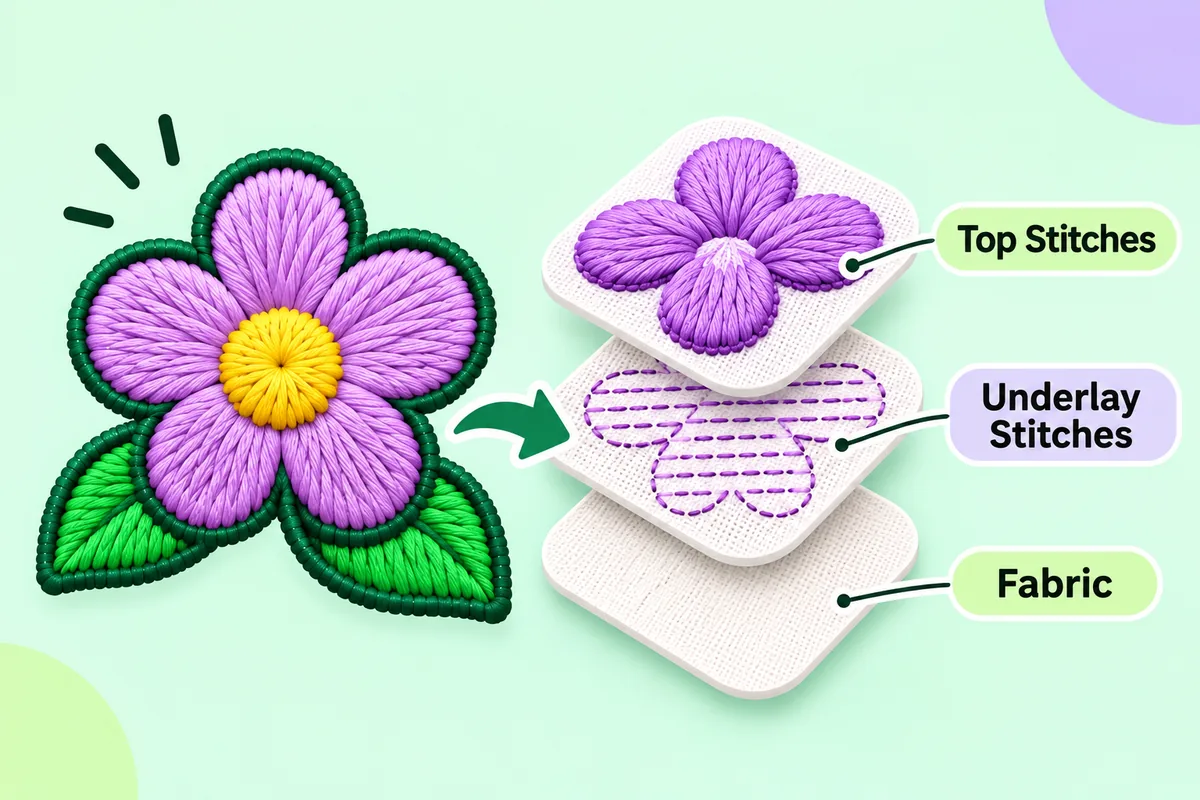
The underlay is the element of an embroidered logo that generally remains invisible. It lies beneath the visible stitches; if it is missing or poorly executed, the flaw is immediately apparent: irregular outlines, thread sinking into the fabric, or shapes that appear flat and lack uniformity.
What underlay is
Underlay is a light layer of stitching sewn first, before the stitches you actually see. Think of it as the foundation of a wall. It does three jobs:
- It anchors the fabric and stabilizer together so the top stitches have something firm to sit on.
- It lifts the thread slightly so it does not sink into soft or textured fabric.
- It gives the top stitches a base that defines the edge of the shape.
You do not choose underlay for how it looks. You choose it for how the final stitches behave.
Why it matters
Fabric moves. Each stitch exerts a pull on the material, while the needle pushes it as it passes through. Without an underlay, the finishing stitches are applied directly onto a surface that shifts beneath them. This can result in gaps, uneven edges, or even the thread sinking into the fabric, a common issue with materials like terry cloth or knitwear.
The underlay also influences the rigidity of the design. A logo with a dense underlay will be firmer and have more relief, whereas a light underlay will make it softer and more flexible. Neither approach is wrong; it all depends on the garment.
Common types
Edge-run underlay is a single line of stitching sewn just inside the edge of a shape. It defines the outline and gives the top stitches a clean boundary. It is often used on its own for narrow shapes.
Center-run underlay is a line down the middle of a narrow column. It stabilizes the shape without adding much bulk, and suits thin satin lines and small letters.
Zigzag underlay crosses back and forth inside a shape. It holds wider satin areas in place and stops the top thread from collapsing between its edges.
Tatami or grid underlay is a sparse fill pattern laid under large filled areas. It builds a stable base before the visible fill goes down.
Many designs combine these. A wide satin column might have edge-run plus zigzag underlay, while a small letter needs only center-run.
Underlay and stitch type
The right underlay depends on the stitch above it. If you are unsure how satin and fill differ, read Satin stitch vs fill stitch first. In short:
- Satin columns need underlay that matches their width. Narrow columns need very little, wide ones need more support.
- Fill areas need a base that stops the pattern from pulling the shape out of line.
- Tiny details often need the lightest underlay possible, because heavy underlay swallows them.
This links closely to text. Small lettering can fill in and blur if the underlay is too bulky, which is one reason minimum text size matters.
What goes wrong
- Too little underlay: edges look jagged, thread sinks into the fabric, and shapes look thin or patchy.
- Too much underlay: the design feels stiff and heavy, small details blur, and the logo can look bulky or puckered.
- Wrong type for the fabric: a stretchy knit often needs more support than a firm cap twill, and a fluffy surface needs more lift than a smooth one.
If you see puckering after sewing, underlay is one possible cause, but not the only one. Stabilizer, tension and needle choice also play a part; see embroidery puckering and thread breaks.
Do you need to set it yourself?
When automatically converting a logo, the software selects an underlay based on the shapes it detects. While this is generally a good starting point, it is merely an estimate. The software has no knowledge of your fabric, your thread, or the desired feel of the finished product.
If you are using an editing program, look for the underlay settings for each individual shape. Here are some common options:
- turning underlay on or off for a shape
- choosing the underlay type
- changing how far it sits from the edge
For a first attempt, keep the defaults and judge the result on fabric. Change one thing at a time so you can tell what made the difference.
How to check it
It is difficult to evaluate the underlay (embroidery reinforcement) on a screen. A preview only shows the visible stitches, not how they sit on the fabric. The only true test is to sew a sample. Observe the edges, check whether any thread has sunk into the material, and assess the rigidity of the embroidered element.
Automatically generated results may require adjustments; therefore, always perform a test on a scrap of similar fabric before beginning actual production.
Where to start
If you have a logo and want to see how it turns into stitches, upload it to the converter on this site and look at the stitch preview. Then sew a small sample on the fabric you plan to use. If edges look weak or the thread sinks, underlay is the first thing to adjust.
FAQ
Do all embroidery designs need underlay?
Most do. Very small or very light designs may need only a little, but without any support, stitches tend to sink into the fabric and edges look ragged.
Can underlay cause puckering?
Yes, too much underlay can add bulk and pull the fabric. Puckering can also come from stabilizer, tension or needle choice, so check those too.
Will converted logos include underlay automatically?
Usually the software adds a standard underlay. It is a reasonable starting point, but it does not know your fabric, so judge it on a sample.
Which underlay suits small letters?
Small letters usually work well with a light center-run underlay. Heavy underlay can swallow fine detail.